
Sculpting Tutorial
by Stephen Mallia
Introduction
The objective of this tutorial is to help other people to sculpt their own figures or at least, for those starting out, to try and convert a commercial figure for it to be as original as possible. In fact, I would strongly recommend to those who never ventured in this wonderful world of sculpting to take things step by step - instead of trying to sculpt an entire figure from scratch, first try to make minor conversions and then slowly go up the ladder. I will go through the different stages of this figure and with the help of text and photos, I will try to make it as simple as possible. One thing I always say to other people is that this is not 'the' way but my way. All sculptors have their own methods of doing things and they all use different tools for the job in hand. It’s just a matter of picking what works best for you and adjusting it for your ways.
Starting out
The creation of a figure may be the result of many things. The love for military uniforms is one of mine apart from the passion I have for the hobby. Most of the time my mind thinks figures. I observe other people and try to find ideas for new poses by looking at the way they react and behave. As soon as my mind is set for a particular subject in a particular pose the fun begins. Anatomy, proportions, body language or narrative - these words are very significant when it comes to figure sculpting. A good book will solve all the problems on the first two whilst a little imagination and observation can be of great help with the latter two. After I set the pose in my mind I ask somebody to take photos of myself in the same pose from all angles. This will give me a good idea of what I need to do. I print these and keep them beside me as reference throughout the project.


The Mannequin
With these in hand I start constructing a mannequin. There are many ways of doing this. Some make armatures from wire. I make a torso and groin area from putty and join them together with paperclip wire. It doesn’t matter how you do it as long as the proportions are correct. Holes are drilled at the neck, shoulder and leg areas and paperclip wire arms and legs are added. Recently I have started using copper wire for these latter parts since I found that I could get better angles at the knees and elbows. The pictures below show the mannequin before being posed.


Now one word of caution here! Take all the time you need at this stage to get the anatomy and proportions correct. Make sure that all is as it should be. No amount of good sculpting and painting will correct a short arm or big head! Posing the mannequin can now start. Again, ensure that you have the correct body harmony. For example, if you have a raised arm, you should have that shoulder up along with the whole torso. Remember that the body moves in harmony. One shoulder up, the opposite down! The following pictures show the mannequin after being posed.


Note the body weight on the right foot and the corresponding movement of the groin area. Also the right shoulder higher reflecting the raised right arm. When I’m totally convinced that the pose is correct I seal it with putty. Usually for these rough layers I use standard Milliput.

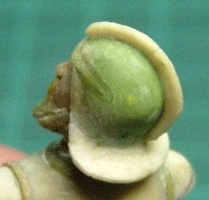
Sculpting the Head
For this particular figure, I also had to sculpt the head. This is because the figure will go into production. With ‘one-off’ figures, I use commercially-available heads and convert these to suit my needs for that particular subject. The sculpting of a head requires a whole tutorial in itself but I’ll say a few words to give an idea of how it goes. The photos of the mannequin show the initial shape of the head in Milliput. On this I draw the lines for the brows, nose and lip area. With a sharp knife I cut a wedge at the brow line and another at the nose line. I also make 2 vertical cuts to bring out the nose shape. Since this face has the mouth open a hole was drilled and then shaped to define an open mouth. At this stage a sharp blade and minute pieces of putty are used to carve and shape the face and add volume. The picture below shows an early stage of the sculpting.

As I said, for the face sculpting I only use a sharp Xacto blade, a small brush soaked in Isopropyl alcohol, some fine sandpaper and some steelwool for polishing. The following pictures show the nearly completed face.


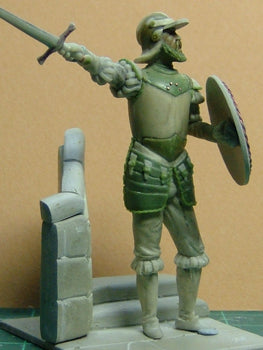
Sculpting the Body, Clothes and Armour
For the sculpting itself I nearly always start with the lower parts, i.e. trousers, gaiters etc. A layer of putty is put on using a spatula, alcohol and my fingers and is given a basic shape. This depends on what the figure is wearing. Since this figure is wearing rather close-fitting trousers, the basic shape of the legs can be seen.


Some basic folds were added at the ankle area using shaped toothpicks and alcohol and the putty is hardened in the crockpot. When dry more putty was added at the knee area, where the cloth would gather and tiny folds added with needles of various gauges (picture 13). For the folds I use toothpicks and needles but you can use whatever works for you. Many use dental instruments or other home made implements. Work will progress in this manner, adding putty in layers and working on small areas little by little. After every session, when the putty is dry I use fine sandpaper and steelwool to polish the figure.


The picture above shows another stage with the left leg sculpted in and details of the right added. Notice the cut in the cloth depicting wear and tear. The picture next to it shows the detail for the left leg added and the first layer for the lower armour put in.


The pictures above show the lower armour nearly complete. These were done with a mixture of Magic Sculp and Kneadadite Duro. The mixture was flattened on a piece of glass using a small rolling pin, talcum and strips of plastic to get the thickness even all the way. Then strips of putty were laid in one by one with the lower ones overlapping the ones above slightly. All the details here will be added later.


The two pictures above show the breast and back plate added in the same manner described earlier except that here a lot of carving and polishing took place. The details were added as described for the lower armour. You may not notice in these pictures but at this stage I committed an error. I had also added the shoulder armour on both left and right sides. For the left side it was fine since the figure has that side dropped and the shoulder will follow shape. Instead, for the right, the arm is raised so the shoulder will be raised. This resulted having to sculpt the shoulder armour raised to accommodate the volume of the arm/shoulder composition. I only found out about this when I was about to sculpt the right arm. I’m saying this to show you that not all goes always smoothly and if that happens do not hesitate to remove the error and restart. In fact that’s what I did. I cut away the right shoulder armour, sculpted the arm and then added the armour at the right position.
Helmet


These series of photos show the various stages of the sculpting of the helmet. Even here I would recommend that when you have an area that requires a lot of sanding and polishing , do not include Duro in the mix. Duro is an excellent putty but it hardly sands. In fact it gave me a hard time in this particular area. I suggest that Duro, either on its own or mixed, be left for details.


The Shield
The shield was made using Milliput thinned down as described and a stencil used to cut out a circular shape. I used a small snooker ball to get that concave shape of the shield. I simply put the circle on the ball and let dry in the crockpot. The pictures below show the result and the shield with the detail added. These are thin strips of putty laid in one by one and given shape with the brush and alcohol.


Arms and Hands
The arms are done somewhat in the same manner as the rest using layers of putty with folds added both on wet and on dry putty. The hands are different. First of all, they are hard to sculpt, at least for me anyway, and secondly one has to give life to the hands to promote feeling. My approach to sculpting hands differs depending on whether they are holding something or not. If they are, I sculpt them round the object putting in each finger separately. If they’re not, I make the basic shape of the hand and let dry. Then I drill tiny holes and insert fuse wire as fingers and shape them. When all is set I put layers of putty for each finger and form using the brush and alcohol combination.


Details
At this stage most of the details are added. This to avoid damaging during handling. The straps and buckles on the thigh armour was added in stages. First the straps, then the buckles and then small details on the buckles themselves.


The edge of the armour has a thin strip of entwined metal. This was achieved by rolling the putty very thin and then placing them alongside. Holding one end I roll the other and thus achieve the effect. Then it’s laid in with brush and alcohol. When dry it’s given a coat of diluted white glue.
Conclusion
Sculpting a figure for me is a great joy. Being able to create something of your own and knowing that it will be the only one in a show is a feeling of its own. I always encourage people to try. Many say that for them it’s impossible or bring out some other clumsy excuse. Give it a go and see what happens. Probably you end up like me…Totally hooked!!!